I hope you can see that I’m squeezing as much functionality out of this tiny cabin kitchen as possible! This kitchen carries its weight and then some while still feeling clean. How do I achieve this? Organization! This post will show you how I built a DIY wall organizer with hooks to keep our keys and entry needs organized.

Everything has a place. Today, I wanted to share this quick, easy, DIY entry organizer that helps keep track of house keys, emergency contact info, shows the indoor/outdoor temperature, and even has room for some decorative plants. Here is my DIY wall organizer in action.

Here is a closer view after I cleaned it up a bit and added a third key hook.

DIY Wall Organizer Build:
Would you believe me if I told you this was built from mostly free pallet wood? Lol, yep! Granted, it was a nicer pallet with decent pine, but yes (!) this was mostly free. Let’s get into the details.
I’m working on plans to help you build your own. Leave a comment below if you’d like me to share build plans for this wall-mounted entry organizer.
Each side piece is a 1×6 x 18″ long. There are two 1×6 back pieces, one top and one bottom, that are 14.5″ in length to make the overall dimensions 18″ wide x 18″ tall. You could modify this to fit your space as needed.
I used a third 1×6 as a wall cleat. You can see that screwed to the wall. This whole build is “rustic” and quick, so I didn’t worry about hiding screws. You could use pocket screws where perpendicular boards meet to hide the connections, and you could connect this to the wall through the top horizontal board behind the plants if you wanted to avoid a cleat.
There are two 1×6 x 14.5″ horizontal boards ripped (cut down on a table saw or with a skill saw) to 4.75″ width. These boards make the bottom of the organizer and the base for the plants.
The final 4 pieces are the 5/8″x1.5″ x 18″ length front pieces. These are poplar boards I purchased at Home Depot, but if you wanted to cut these from larger pallet pieces on a table saw, you sure could. I attached those boards to the frame with small finish nails. I’d recommend pre-drilling the nail holes to avoid splitting the wood so close to the end.
Here is the built organizer in bare wood.

Finishing Touches:
I gave this a light sanding and painted it with two coats of leftover primer from previous projects. Then I gave it a coat of semi-gloss white paint for durability. Here it is freshly painted. You can see the small can of paint I bought from Home Depot that was all I needed. The wall cleat board is to the left.

I attached three chrome-plated robe hooks to the bottom poplar boards. Make sure the bottom of the hooks rest at least slightly on the bottom board. That will keep the hook from rotating.
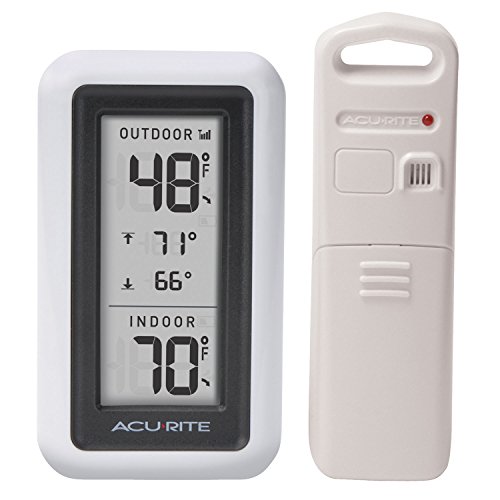
It’s really nice to see the indoor and outdoor temperature when you head out the door, so I added a small digital thermometer in the upper left corner. It has an outdoor sensor as well. You can find it here.
The 3 pots and plants were found at Ikea. They always have a great selection. I started with live plants but they didn’t get much sun, so I switched to faux plants from Ikea. Don’t tell anyone they’re fake! I think they add a nice touch of green.
Then I mounted this to the wall. Here is the finished product.

AcuRite Digital Thermometer with Indoor, Outdoor Temperature
- Wireless Indoor Outdoor Thermometer: The easy-to-read LCD display, acting like an outdoor thermostat, provides current indoor and outdoor temperature with precision and accuracy
- Strong Remote Thermometer: The wireless outdoors thermometer sends outdoor temperature readings to the indoor temperature monitor from up to 165 feet (50 meters) away


